
In this post I will describe one interesting customer request we had previously dealt with. This is an older project, but I think the problem is still relevant.
The customer has an existing web application that is hosted in a dedicated datacenter along with the entire HW infrastructure, which includes [Citrix NetScaler] (https://www.citrix.com/products/netscaler-adc/) - a load balancer and reverse proxy appliance with few extra features. One such feature is an authentication gateway, i.e. NetScaler only allows access to backend applications to authenticated users. The customer’s web application is, however, only one of many applications that together form a complex system. All the applications are hosted in the same data center and share the same domain users, i.e., the domain user can access every application with one username/password pair. Within each application, each domain user is mapped to an application user. The situation is schematically illustrated in the following figure.
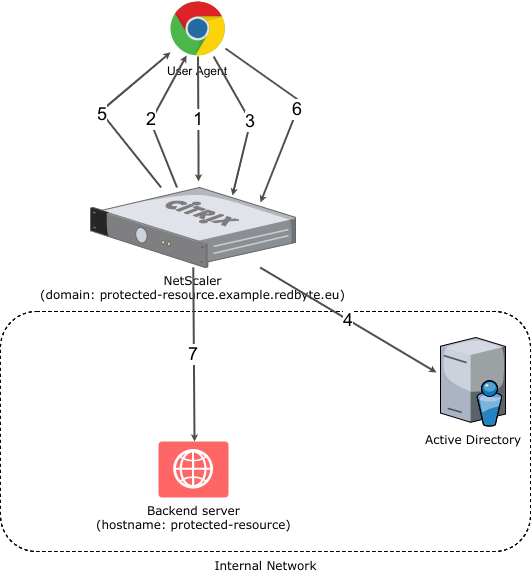
The simplified user authentication process consists of the following steps:
- HTTP GET https://protected-resource.example.redbyte.eu
- NetScaler detects that the user is not authenticated and redirects (HTTP 302) to login page
- POST HTTP request to login page
- User Authentication against Active Directory
- Redirect (HTTP 302) to the original destination (https://protected-resource.example.redbyte.eu)
- HTTP GET https://protected-resource.example.redbyte.eu
- Proxy to a backend server. The backend server reads domain username from HTTP header and identifies the corresponding application user.
The problem with such setup is its testability. The customer has several staging environments and introducing NetScaler into these environments would be overkill (not counting the domain management for all the environments). The customer’s request was to somehow “bypass” NetScaler and all the complexity of user configuration and management without changing the code or configuration of the application. It had to look and behave as if NetScaler was there.
Meet the ngx_http_auth_request_module
The first solution that came to our minds was to use the excellent [HAProxy] (http://www.haproxy.org/) load balancer (because we have several backends) and place a custom authentication proxy before it. Let’s call it FakeNetScaler (basically a reverse proxy server). This would mean that each HTTP request would be processed by two reverse proxies. Surely, there must be a more straightforward and simpler solution.
Another solution is to use [NGINX] (https://nginx.org/) HTTP Server along with the [ngx_http_auth_request_module] (http://nginx.org/en/docs/http/ngx_http_auth_request_module.html). The documentation for this module says, it implements client authorization based on the result of a subrequest. What exactly does this mean? The principle is quite simple - when you make an HTTP request to a protected URL, NGINX performs an internal subrequest to a defined authorization URL. If the result of the subrequest is HTTP 2xx, NGINX proxies the original HTTP request to the backend server. If the result of the subrequest is HTTP 401 or 403, access to the backend server is denied. By configuring NGINX, you can redirect those 401s or 403s to a login page where the user is authenticated and then redirected to the original destination. The entire authorization subrequest process is then repeated, but because the user is now authenticated the subrequest returns HTTP 200 and the original HTTP request is proxied to the backend server.
Naturally, NGINX only provides a mechanism to achieve this - the authorization server must be custom build for specific use case. In our case, FakeNetscaler is the authorization server - I will get to that later. Now let’s see how the ngx_http_auth_request_module works:

- HTTP GET https://protected-resource.example.redbyte.eu
- NGINX sends an authorization subrequest to FakeNetScaler
- The user is not yet authenticated, so FakeNetScaler returns the HTTP 401 code
- NGINX redirects browser (HTTP 302) to login page
- The user enters the login credentials and submits the login form
- Login credentials are valid, FakeNetScaler returns a cookie containing “the user with username XXX is authenticated” and redirects browser (HTTP 302) to the original destination
- HTTP GET the original destination
- NGINX sends an authorization subrequest to FakeNetScaler
- FakeNetscaler reads the cookie content and realizes that the user is authenticated, therefore returns HTTP 200 as the result of the subrequest
- NGINX proxies the request to a backend server, together with HTTP header with domain username. Backend server reads the domain username HTTP header and identifies the corresponding application user.
At first glance, this seems to be even more complex than the original NetScaler authentication process, but the truth is that I just described it using white box approach, where in case of NetScaler it was described as a black box (especially the points 3., 4. and 5.).
It should be clear now, how the ngx_http_auth_request_module works. Let’s look at the NGINX configuration file for protected-resource.example.redbyte.eu domain:
server {
  listen   443 ssl;
  server_name protected-resource.example.redbyte.eu;

  # ssl and server configuration left out

  location / {
    auth_request /auth;
    error_page 401 = @error401;

    auth_request_set $user $upstream_http_x_forwarded_user;
    proxy_set_header X-Forwarded-User $user;
    proxy_pass http://protected-resource:8080;
  }

  location /auth {
    internal;
    proxy_set_header Host $host;
    proxy_pass_request_body off;
    proxy_set_header Content-Length "";
    proxy_pass http://fakenetscaler:8888;
  }

  location @error401 {
    add_header Set-Cookie "NSREDIRECT=$scheme://$http_host$request_uri;Domain=.example.redbyte.eu;Path=/";
    return 302 https://fakenetscaler.example.redbyte.eu;
  }

}
The most important lines are:
- 8 - here we say that for all URLs beginning with
/NGINX will execute the authorization subrequest to the/authURL - 9 - that HTTP code 401 will be redirected to the login page
- 11 - here we set $user variable to the value sent by authorization server via the X-Forwarded-User HTTP header
- 12 - X-Forwarded-User HTTP header is set by NGINX to the value of $user variable
- 16 - here we define the authorization subrequest. The subrequest is proxied to
http://fakenetscaler:8888, which is a host on the internal network - 25 - here we set a cookie with original destination URL
- 26 - an HTTP 302 redirect to the login page served by the authorization server. In this case, we need to use a full domain name because the browser is not able to resolve internal hostnames.
NGINX configuration file for authorization server domain fakenetscaler.example.redbyte.eu:
server {
  listen   443 ssl;
  server_name fakenetscaler.example.redbyte.eu;

  # ssl and server configuration left out

  location / {
        proxy_set_header Host $http_host;
        proxy_pass http://fakenetscaler:8888;
  }
}
As you can see, it is a reverse proxy to a backend server at http://fakenetscaler:8888 running the autorization HTTP server.
FakeNetScaler
So far, we have only played with NGINX server configuration. Let’s look at the FakeNetscaler authorization server. As I mentioned earlier, NGINX only provides an authorization framework, the authorization server needs to be custom build and tailored to customer’s requirements:
-
must be able to respond to HTTP GET
/authrequest and decide whether or not the user is authenticated on a cookie. If it is, it will respond with HTTP 200 if it does not, HTTP 401 -
to HTTP GET
/displays the login page -
to HTTP POST
/submit the login form. If a user has entered the correct login and password, the cookie establishes that the user is authenticated and redirects it to the original destination based on the information stored in the Cookie. If the user did not enter the correct login information, the login page with the error description will be displayed again -
must be able to respond to the HTTP GET
/authrequest and based on the cookie value, decide whether user is logged in or not. In case the user is logged in the HTTP response code is 200, 401 otherwise. -
HTTP GET to
/URL displays the login page -
HTTP POST to
/URL submits the login form. If the user has entered a valid username and password, a login cookie is created and the browser is redirected to original destination. If the user did not enter valid username or password the login page with error message is displayed.
This should be a really simple service and we are going to implement it using the [Go] (https://golang.org/) programming language. Go has a rich standard library including a very capable HTTP server. There is no need for a third party server runtime (e.g. as in most Java deployments).
Please, judge yourself, this is a complete source code of FakeNetScaler server:
package main

import (
	"flag"
	"fmt"
	"github.com/BurntSushi/toml"
	"github.com/codegangsta/negroni"
	"github.com/gorilla/securecookie"
	"github.com/julienschmidt/httprouter"
	"gopkg.in/unrolled/render.v1"
	"log"
	"net/http"
	"time"
)

var (
	nsCookieName         = "NSLOGIN"
	nsCookieHashKey      = []byte("SECURE_COOKIE_HASH_KEY")
	nsRedirectCookieName = "NSREDIRECT"
	cfg                  config
)

type config struct {
	// e.g. https://protected-resource.example.redbyte.eu
	DefaultRedirectUrl string
	// shared password
	Password string
	// shared domain prefix between protected resource and auth server
	// e.g. .example.redbyte.eu (note the leading dot)
	Domain string
}

func main() {

	// configuration
	port := flag.Int("port", 8888, "listen port")
	flag.Parse()
	var err error
	if cfg, err = loadConfig("config.toml"); err != nil {
		log.Fatal(err)
	}

	// template renderer
	rndr := render.New(render.Options{
		Directory:     "templates",
		IsDevelopment: false,
	})

	// router
	router := httprouter.New()
	router.GET("/", indexHandler(rndr))
	router.POST("/", loginHandler(rndr))
	router.GET("/auth", authHandler)

	// middleware and static content file server
	n := negroni.New(negroni.NewRecovery(), negroni.NewLogger(),
		&negroni.Static{
			Dir:    http.Dir("public"),
			Prefix: ""})
	n.UseHandler(router)

	n.Run(fmt.Sprintf(":%d", *port))
}

func authHandler(w http.ResponseWriter, r *http.Request, _ httprouter.Params) {
	var s = securecookie.New(nsCookieHashKey, nil)
	// get the cookie from the request
	if cookie, err := r.Cookie(nsCookieName); err == nil {
		value := make(map[string]string)
		// try to decode it
		if err = s.Decode(nsCookieName, cookie.Value, &value); err == nil {
			// if if succeeds set X-Forwarded-User header and return HTTP 200 status code
			w.Header().Add("X-Forwarded-User", value["user"])
			w.WriteHeader(http.StatusOK)
			return
		}
	}

	// otherwise return HTTP 401 status code
	http.Error(w, http.StatusText(http.StatusUnauthorized), http.StatusUnauthorized)
}

func indexHandler(render *render.Render) httprouter.Handle {
	return func(w http.ResponseWriter, r *http.Request, p httprouter.Params) {
		// just render the login page
		render.HTML(w, http.StatusOK, "index", nil)
	}
}

func loginHandler(render *render.Render) httprouter.Handle {
	return func(w http.ResponseWriter, r *http.Request, p httprouter.Params) {
		login := r.PostFormValue("login")
		passwd := r.PostFormValue("passwd")

		var errorMessage = false

		// nothing fancy here, it is just a demo so every user has the same password
		// and if it doesn't match render the login page and present user with error message
		if login == "" || passwd != cfg.Password {
			errorMessage = true
			render.HTML(w, http.StatusOK, "index", errorMessage)
		} else {
			var s = securecookie.New(nsCookieHashKey, nil)
			value := map[string]string{
				"user": login,
			}

			// encode username to secure cookie
			if encoded, err := s.Encode(nsCookieName, value); err == nil {
				cookie := &http.Cookie{
					Name:    nsCookieName,
					Value:   encoded,
					Domain:  cfg.Domain,
					Expires: time.Now().AddDate(1, 0, 0),
					Path:    "/",
				}
				http.SetCookie(w, cookie)
			}

			// after successful login redirect to original destination (if it exists)
			var redirectUrl = cfg.DefaultRedirectUrl
			if cookie, err := r.Cookie(nsRedirectCookieName); err == nil {
				redirectUrl = cookie.Value
			}
			// ... and delete the original destination holder cookie
			http.SetCookie(w, &http.Cookie{
				Name:    nsRedirectCookieName,
				Value:   "deleted",
				Domain:  cfg.Domain,
				Expires: time.Now().Add(time.Hour * -24),
				Path:    "/",
			})

			http.Redirect(w, r, redirectUrl, http.StatusFound)
		}

	}
}

// loads the config file from filename
// Example config file content:
/*
defaultRedirectUrl = "https://protected-resource.example.redbyte.eu"
password = "shared_password"
domain = ".example.redbyte.eu"
*/
func loadConfig(filename string) (config, error) {
	var cfg config
	if _, err := toml.DecodeFile(filename, &cfg); err != nil {
		return config{}, err
	}
	return cfg, nil
}
After compiling the Go code, a statically linked binary with no other runtime dependencies is created. When you run it you will get an HTTP server listening on port 8888.
Summary
In this blog, we have shown how to use NGINX and its ngx_http_auth_request_module, which provides a basic framework for creating custom client authorization using simple principles. Using the Go programming language, we have implemented our own authorization server, which we used together with NGINX.